So it was the big day, April 6th. It was perfect ... nothing good on TV ... no after work social sports team activity (see
flightoftheconchords.co.nz). As an aside to my aside I saw them (FOTC) with my brother in concert at Kent State University. It was awesome. Moving on, so really it was about 60F which was warm enough to put the bees in. I took a half-day at work to prepare myself mentally (I am really scared of bees). Everything was ready for when L got home. All she had to do was move her actual hive parts outside. So we go down to the basement where the bees were still quite happy (we fed them twice a day with 1:1 sugar syrup). We each claim a package and bring them to our hive site. Our hive site had been prepared earlier and consists of two cinder blocks in a small gravel pit. The hives will sit on the cinder blocks. Anyway we decide L will hive her bees first. We're in our veils with long sleeves and long pants. I have latex gloves on, L goes barehanded ... crazy. I also put my socks above my pants, last thing I want is some bees crawling up my pants! It was pretty sylish as you can imagine. Laura is definately ready as seen in the picture below:

Not many dead bees in the packages, hooray! Anyway the first thing you do is take the piece if wood off the top which is covering a can filled with sugar syrup which the bees eat. We fed them more just to be nice (and cause the books said to). Also sticking out is the tag attached to the queen cage. Below is a picture of the queen cage after our first inspection ... it helps the installation story to make sense.

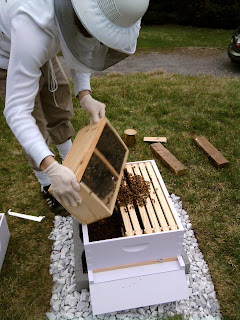
Anyway, you're supposed to start prying out the can, while holding onto the tag attached to the queen cage. Then you slam the bees to the ground so they fall away from the top of the package. It wouldn't make you happy either. Anyway we got all that. I think L was in charge of the can and I had to get the queen. She gets the can wedged out and I pull on the queen tag to get the full cage. Disaster!!!! The tag (the white plastic stuff in the picture) came off completely and L's queen cage fell into the unhappy pile of bees in the package. It turns out none of the books cover what to do in this instance. We (eventually) decided to dump some of the bees into the hive (Where we had removed four frames as seen in the pic below). This picture is actually of my installation, but it helps give an idea of what it looked like for L too.
So the queen cage falls into the hive space during her pour (violent shake) of about half the bees. So she reaches into this buzzing, unhappy mess barehanded to retrieve her queen. Sounds like a Chaucer tale! We had a few pushpins outside because you need to tack the queen cage into the hive. So we used some of these to attach the plastic strap back to the queen cage. All the while there are some unhappy bees starting to fly around. L got stung on the leg during this process and I was stung on the shoulder. We soldier on however. Finally L manages to get the queen cage strung up in the hive with the 'exit door' unblocked. This is important because the workers have to release the queen by chewing through a taffy like substance which blocks this 'exit door' (basically just a hole, but that seems like undervaluing it). Anyway she dumps the rest of the now restless bees into the hive and puts three of the four frames back in, but she can't fit the tenth frame. This shouldn't be a problem though because some of our books say to only have 9 frames in there after installation. She puts the feeder on top, fills it with sugar syrup and we're finished ... well actually half-way finished, I still had to install my bees. I think that'll be the next post. I need a breather after reliving that.


No comments:
Post a Comment